Capture the People

When travelling we all capture photos of the iconic buildings, famous landmarks and well known sites.  But the memories of a place are more than just the landscape.  It is often the people that really define a place.

Street photography is very popular, especially in big cities.  This is where you try to capture people going about their daily routine while telling a story or emotion. This could be an activity going on or something that just represents the place. 

But you don't have to be in a city to capture people you come across in your travels. From the country town to the local beach, taking photos of people adds another dimension and memory to your trip.

I must admit that it I don't find it easy capturing images of people. It can be daunting.   There are two approaches you can use.  The first is to ask permission and the second is to try to capture a photo without them knowing. Both are useful as it really depends on what you are trying to capture.

Taking a photo without someone knowing is easy when you are not close or want to capture the image from behind.

But it becomes a bit trickier if you are close up.  Despite this there are a few trick to try. This includes shooting from the hip.  This takes some practice as you need to guess what is in the frame. Another way is to look at something behind or to the side of the person (don't look directly at them) only when you raise the camera do you quickly frame the shot.

The other option is to directly ask someone to pose. What is the worse that could happen?  They could say no. Ideally you should engage in a conversation with them first.  Ask them what they do, how long they have lived there etc.  Not only does this put them at ease, it creates a story to the photo.

Asking for permission can prevent the capture of that candid moment but it also allows you to get up close and personal.  

Having photos of locals or other people in your travel photos provides a richer story.  Just remember what ever approach you chose you need to be respectful of the person.

Next time you are travelling capture the iconic landmarks but don't forget about the things that really make a place - the people. 


Create a blur

I have talked previously about drawing the viewers attention to a part of your image you want them to focus on by using leading lines, framing etc.  But one of the common methods is to have the object, person or scene in focus (image is nice and sharp) and the rest of the scene is blurry. 

An example of this is from a recent trip to the Blue Mountains. 

OLYMPUS E-M1, Lens: M.45mm F1.8,   ¹⁄₃₂₀₀ sec at ƒ / 1.8,   0 EV,  Aperture priority, ISO 320

Here you can see that the glass at the front is sharp and in focus but it get more out of focus in the background.

Many professional photos you see use this technique that often sets it apart from the many point and shoot images taken.

But how is this achieved?

A shallow depth of field uses the ‘aperture’ of the lens. This looks like a series of blades with a hole on the middle, which controls the amount of light getting to the camera sensor. A dial called the aperture (f-stop) sets the size of the hole.

While a bit confusing to begin with, it looks like this:

Large hole = large aperture = Small f-number (eg; f2.8) = Shallow (small) depth of field

Small hole = small aperture = Larger f-number (eg; f/22) = Deeper (larger) depth of field

Some, but not all lenses, can go down to smaller f-number (such as f1.8).  These are often called ‘portrait lenses’,  or ‘fast glass’ as they allow you to take photos in darker conditions 

So how do you do this on my camera?

There are different ways using your camera to achieving a shallow depth of field. You can do this by:

1.     Camera that has manual settings – if your camera has the ability to change the aperture such as ‘Aperture Priority’ set it to this and select the lowest number possible (eg f2.4). The camera will expose the image correctly.

2.      Look for an image of ‘persons head’ or ‘macro’ on your camera dial.  This will tell the camera to select a shallow aperture.

3.     If you have an iphone there are some apps that simulate a shallow depth of field because the lens on it cant achieve it normally

4.     If you don’t have this still try the options below


There are other ways to help producing a shallow depth of field.

Select a longer lens:  If you have the ability to use a zoom or lens with longer focal length then you have more chance of getting a shallow depth of filed. The reason is complicated and something probably best left to google if you are interested.

 Get Closer: When you get really closer to your subject such as a macro the depth of field also reduces.

 There are different ways to use depth of field.  Examples include:

1.     having the object in front in focus and a blurry background

OLYMPUS E-M1, LENS: OLYMPUS M.45mm F1.8, ¹⁄₈₀₀₀ sec at ƒ / 2.2, 0 EV, Aperture priority, ISO 320

2.     Having the object in the distance in focus and foreground blurry

OLYMPUS E-M1, LENS: OLYMPUS M.45mm F1.8, ¹⁄₂₅₀₀ sec at ƒ / 1.8, 0 EV, Aperture priority, ISO 320

3.    Having a transition from front to back

(see below for a little bit on the post processing of this photo)

So if you can, next time try and use your aperture priority or portrait mode and see if it makes a difference to your photos.


To finish a couple more from the trip.


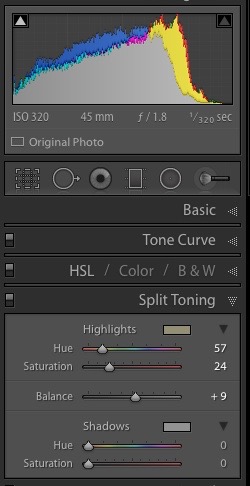
The Photo of the tools leaning against the wall above have been processed in Lightroom.  i like the old world look and Lightroom has a great ability to enhance this.

OLYMPUS E-M1, LENS: OLYMPUS M.45mm F1.8, ¹⁄₃₂₀ sec at ƒ / 1.8, 0 EV.0, Aperture priority, ISO 320

On the Left is the image with no adjustments.  For the one on the right it has has 2 significant changes.  

The first is split toning.  This is often a matter of trial and error choosing different colours to get the effect you want.  

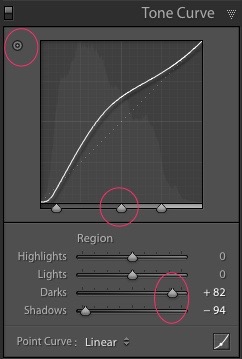
The second was playing with the tone curve.  The intention was to make the mid-tones lighter (middle of the curve).  There are different ways in lightroom to play with this including selecting the circle in top right then going to your photo and selecting a point then dragging the mouse up or down. Alternatively you can move the sliders.


Now I must admit i rarely use Tone Curve as often the General Adjustments are all I need but sometimes it is fun to play around and see what you get.

It has also been finished with some DE-saturation, less clarity and also a bit of vignetting.

What will others remember you by?

I have been taking photos for far too many years to count.  This has been one of my passions and has allowed me to see the world in a different way.  Over the years my photography has changed with a growing interest in landscapes and this great country of ours.  

But I am also starting to question what memories I will leave behind.  Several years ago my mother passed away and I had the job of pulling together a slide show of the memories of our family.  Sitting going through old slides and photo albums, a flood of memories came back bringing a tear to the eye.

But what will the experience be in 50 years time?  With the creation of digital photos we now have thousands of images in hard drives or on flash drives.  I cant imagine these working or being looked at in 50 years when I am no longer around (remember floppy disks?).

Many of us also put these images on social sharing sites such as Facebook but the fleeting nature of the images amongst thousands of other posts about cats and politics means they are lost in a global sea of data.  While there are dedicated photo sites such as Flikr the question is - will they still around?

While I use all of these, I must admit to being traditional as I also create hard copy books of most of my travels.  hopefully these will survive in an attic to be dusted off by my great grand children. 

This also leads me to the question of what photos I used for the slide show.  They were not images of scenic landscapes, waterfalls of wildlife.  They were photos of family and friends, my mum at work, playing golf and having a good time.

So what does this mean?  While i will continue to take photos of this great country, i will spend a bit more time capturing my family enjoying the great outdoor.  I will even try to get some of me in the photos (difficult as I am the photographer most of the time).

LONR - memories-1.jpg


Next time you are travelling think  - what meaningful image do you want to be passed on to future generations?

Subtraction

If you have ever sat and watched a painter you will see the time and effort they put in to building up an image, adding paint slowly, brush stroke by brush stroke. Photography is much like painting but I like to think of it in reverse.   The art of a good picture is to constantly take things away until you have the image you are trying to paint.

When you first stop and look at a scene, the first instinct is to try to capture as many things as possible in the frame. However a photos that has lots of things can appear to be busy with no clear focal point or purpose. A good photo draws your eye in to an image moving left to right or front to back ideally directing the viewer to the main figure you want their eyes to rest on, for example a person, tree, mountain.

EXIF DATA: OLYMPUS OMD E-M1, Lens: M.9-18mm F4.0-5.6, ¹⁄₂₅₀ sec at ƒ / 18, 0 EV, ISO 200


Once you have worked out the main point of your picture, stop and look at the things that are not relevant.  Is there a pole sticking out of their head?  Is there a shrub that does not do anything? Is there something in the background that is distracting?  Sometimes it is just a matter of waiting a few seconds for things to move or taking a step to the side or closer to remove the distraction.

Next time you are out try subtracting and see what you end up with?

Take a Closer Look

We all know the draw of a lookout. The opportunity to take in those grand vistas, views of mountain ranges or large ocean views.  When taking photos while travelling it is easy to focus on these scenic images.  Many of the photos I take are panoramic images capturing the expanse of the Australian outback or coast. Often these are the first thing that captures the eye.

However a memory of a place is also about the detail.  While an obvious example may be a close up of a flower, there are lots of other ways to capture the detail - it could be the colours, the textures and small objects that make up the scene.  

Detail shots allow you to tell a broader story of your travels.  It is an opportunity to show parts of a place in a different way to what many people see. Look for those things that normally may go un-noticed.

Below is an example from a trip to Fingal Bay, NSW. 

In these images my aim was to capture the textures and shadows of the beach.  when combined, they become more powerful telling a broader story.  When composing the images together I have tried to keep each row a similar theme. for example in the image below the first row captures the shadows, the second row things found washed up on the beach, the third row is the green, and the fourth is the texture of the rocks.

So next time you are out slow down and look around.  Look down, get down on your hands and knees.  Take a closer look.  You may be surprised with what you see.


For those that are interested, there are several programs around that you can use to combine photos together.  Often I use Adobe Elements or Photoshop but in the example below this was in Lightroom.  If you use the 'Print function' there are several picture packages already provided. The only variation is rather than printing you send the output as  jpeg file.

Into the Frame

I thought I would continue to talk about composition as many people today either use their phones of leave their camera on P (program) letting the camera do the thinking.  Despite this you can still create some dramatic images if you understand composition.  The next image gives another example of a composition trick.

EXIF DATA: OLYMPUS E-M1,  lens: M.12-50mm F3.5-6.3, ¹⁄₁₂₅ sec at ƒ / 13, ³⁄₁₀ EV, Aperture priority, ISO 200

FRAME IT: There is something complete when you see a photo in a frame.  But have you thought about capturing a frame in your photo? I mentioned previously having something in the foreground when doing landscape shots.  Sometimes you can add to this by creating a natural frame for your photo.  In the above shot I used the tree to frame the mountains behind. 

The intention is always to draw the viewers eye to the object you want them to focus on, drawing them in to the picture. 

The frame does not need to go all the way around.  It may be an image of the mountains with a tree on either side of the photo.

For those with more advanced cameras you can also begin to think if you want the frame to be in focus or out of focus (for an example of this see the image below).


Next time you are out look for ways to frame your shot.  This could be between 2 trees or rocks, through a door or window or fence. I have included a few more images below to give you an idea of the possibilities out there.

PROCESSING: The top photo itself didn't have much more done to it apart from the usual lightroom adjustments.  The biggest was in the shadows, in particular the tree trunk. As with most photos out of the olympus I find it also needs some clarity and vibrance to really make landscape photos pop.  I also gave the red mountains behind a slightly more vibrance than the rest of the photo to not oversaturate the entire image but draw the eye to these amazing hills.  While the blue skies of the outback are amazing, having looked more at this photo I think the sky has been overdone so ideally I would pull this back a bit.  

Composition 101

This is probably one of the most photographed images in the Flinders Ranges, South Australia. 

And this is what it looked like directly out of the camera.  I have described below some of the good and not so good points about this photo and how i got there. These principles can be used on any of your next photos of your trip - give it a go.

EXIF DATA: NIKON D200 12.0-24.0 mm lens f/4.0,  ¹⁄₂₀ sec at ƒ / 13,  0EV,  Aperture priority,  ISO 160, jpeg output. 

THE CAPTURE

Firstly lets start with composition. Yes i know the biggest difference you notice is in the colours but post processing cant save a photo if it does not have good composition.

Aspect Ratio: when composing your photo dont automatically pick up the camera and shoot.  Think if the image would look better vertical or horizontal.  In this situation a horizontal image works but many new to photography dont try vertical photos enough. 

Leading lines: The couple of things that make this a popular photo spot is the walking trail leading your eyes from the front of the picture to the mountains behind. This concept of leading lines is one of the keys to good composition of a photo.  It draws you in to the picture and makes you look at several parts of the image. Look for fence lines, power lines, roads, tree lines, creeks or rivers - anything that leads the eye to your subject.

Foreground: The other thing that makes this location work is having strong foreground and background to a photo.  By having something in the front (such as the two bushes in this example) it gives depth and perspective. This can be done in most situations but especially in landscape photography where you want to give a sense of space and depth. While mountains may be spectacular if people do not get a sense of size it wont be as dramatic.  Next time you see a great mountain look for something to place in the front - a rock, shrub, flowers or even your kids.

Rule of thirds:  photographers debate if you should or should not follow this rule but I think it is like music.  You need to know the basic notes first before you can change them in to real music with feeling. If you break your view in to thirds (as i have shown with lines on this image) you can place your main image, person, horizon, bird etc on any of these lines or where they intersect. In this example the mountains and bushes align.  While this image also works with the track in the middle in many situation you want to avoid putting things in the centre of the photo. Our brain recognises a balanced image more often if it is sitting on the left or right third of the frame.

Later on we can talk about breaking the rules but for now give these a go. I hope you have found this useful.


POST PROCESSING

I wont go in to much post processing info in this post as the main thing I wanted to cover was composition for those learning photography.

i will save more in depth discussion on post processing for the future but in summary use lightroom 6 for 99% of my editing work, exept for star photos and panos. This photo directly out of the camera was very dull with the exposure between the sky and land very different.

One of the things i didnt do was to capture this in RAW format, rather it was processed in the camera as a 'jpeg' file.  For those new to photography this may not mean much and you really only need to think about it unless you are going to move to some more serious post processing.

However, being a jpeg file meant that i didn't have much room to play with in the dynamic range.  Generally it has had:

- a small amount of cropping to centre the track

- clone to remove some bad dust on the sensor

- graduated exposure to the sky

- adjustments below


Create A Theme

Traveling provides an unlimited opportunity to capture different parts of this unique country.  While this involves capturing the memories of our trip it also provides an opportunity for me to think about some photography projects along the way. An example is a project i have been doing for a couple of years now to capture the demise of our disappearing Service Stations.  

These were once provided the essential services for a town not only providing fuel but all manner of goods and services to the locals. With the creation of expressways many small servos that relied on this passing trade have become decaying buildings.  The invention of the super centre has also meant many people don't bother to stop at these smaller stations.

So when I am travelling this great country of ours I am always on the lookout of the relics of these buildings. 


I have also been taking a shell with me when ever we travel along the coast.